
Configuring NAT (Network Address Translation)
Continuing for the tutorial series of configuring Cisco router to work with cable internet, now we'll set the router to do NAT.
When connecting your router to the cable internet through cable modem, your router will receive a dynamic IP address from the ISP DHCP server according to the scenario.
While you only get one IP address from the ISP, you also need to connect more than one computer to the internet.
Plus the public IP address is different network with the private IP addresses in your LAN.
NAT can solve this problem, it stores the requesting private IP addresses in the address translation table of the router, translates every request from your LAN and forward it to the internet using the single public IP address.
Now NAT can be used in different scenario, but I'll save them for future posts, for now the NAT form that we'll use is many-to-one scenario of NAT.
Many private IP addresses translated to be one public IP address, some people call it overloading and/or Port Address Translation (PAT).
NAT Overload will assign a unique logical port number to every request from the LAN to the internet thus PAT.
For example, if you have a public IP address of 202.1.1.1, then for a request from the user of 192.168.1.20 in your LAN will be translated into 192.168.1.20:1720 for the incoming request to the router, and 202.1.1.1:1521.
This is how the router can identify which request goes to which device.
To configure it requires some steps, first lets see again how the network diagram looks like:
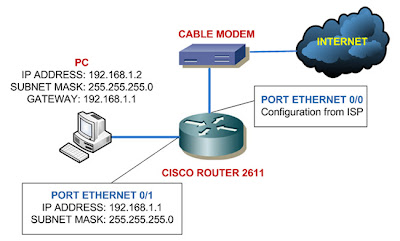 The image shows I only use one computer to connect to the internet, for now lets pretend I have a lot of computers in my LAN for internet connection.
You need to remember three basic steps for configuring NAT/PAT:
Create Access List
router> enable
router# configure terminal
router (config)# access-list 101 permit ip 192.168.1.0 0.0.0.255 any
Issue PAT command
router (config)# ip nat inside source list 101 interface Ethernet0/0 overload
Identify interfaces for ip nat inside and outside
router (config)# interface ethernet0/0
router (config-if)# ip nat outside
router (config-if)# interface ethernet0/1
router (config-if)# ip nat inside
That's it three easy to remember steps for configuring NAT/PAT, one last thing to do for connecting your router to the cable internet is configuring default route.
Configuring Default Route
I decided to include configuring default route into this post since I only have a simple network topology and we only need one line of command to configure the default route.
Here's how we do it, from the last command we jump back to the global configuration mode:
router (config-if)# exit
router (config)# ip route 0.0.0.0 0.0.0.0 ethernet0/0
What the above command does is to route all request that point to any ip address that the router doesn't know (0.0.0.0 0.0.0.0) to the ethernet0/0 interface.
If you have a static public IP address from the ISP then you can replace the ethernet0/0 with the IP address given by the ISP.
That concludes the tutorial series for connecting your router to the internet cable, thank you for following the series, and please give me feedback about my posts.
Please read also:
Configure Cisco Router to Work With Cable Internet - Part 1
Configure Cisco Router to Work With Cable Internet - Part 2
Configure Cisco Router to Work With Cable Internet - Part 3
Continuing for the tutorial series of configuring Cisco router to work with cable internet, now we'll set the router to do NAT.
When connecting your router to the cable internet through cable modem, your router will receive a dynamic IP address from the ISP DHCP server according to the scenario.
While you only get one IP address from the ISP, you also need to connect more than one computer to the internet.
Plus the public IP address is different network with the private IP addresses in your LAN.
NAT can solve this problem, it stores the requesting private IP addresses in the address translation table of the router, translates every request from your LAN and forward it to the internet using the single public IP address.
Now NAT can be used in different scenario, but I'll save them for future posts, for now the NAT form that we'll use is many-to-one scenario of NAT.
Many private IP addresses translated to be one public IP address, some people call it overloading and/or Port Address Translation (PAT).
NAT Overload will assign a unique logical port number to every request from the LAN to the internet thus PAT.
For example, if you have a public IP address of 202.1.1.1, then for a request from the user of 192.168.1.20 in your LAN will be translated into 192.168.1.20:1720 for the incoming request to the router, and 202.1.1.1:1521.
This is how the router can identify which request goes to which device.
To configure it requires some steps, first lets see again how the network diagram looks like:
The image shows I only use one computer to connect to the internet, for now lets pretend I have a lot of computers in my LAN for internet connection.You need to remember three basic steps for configuring NAT/PAT:
- Create access list to decide which private IP addresses are allowed to be translated by the router.
- Issue the NAT command to cooperate NAT with access list that we created and tell the router that we need to overload the requests if you use PAT.
- Identify which interface in the router that is connected to the LAN then issue ip nat inside command, and which interface is connected to the internet then issue ip nat outside command.
Create Access List
router> enable
router# configure terminal
router (config)# access-list 101 permit ip 192.168.1.0 0.0.0.255 any
Issue PAT command
router (config)# ip nat inside source list 101 interface Ethernet0/0 overload
Identify interfaces for ip nat inside and outside
router (config)# interface ethernet0/0
router (config-if)# ip nat outside
router (config-if)# interface ethernet0/1
router (config-if)# ip nat inside
That's it three easy to remember steps for configuring NAT/PAT, one last thing to do for connecting your router to the cable internet is configuring default route.
Configuring Default Route
I decided to include configuring default route into this post since I only have a simple network topology and we only need one line of command to configure the default route.
Here's how we do it, from the last command we jump back to the global configuration mode:
router (config-if)# exit
router (config)# ip route 0.0.0.0 0.0.0.0 ethernet0/0
What the above command does is to route all request that point to any ip address that the router doesn't know (0.0.0.0 0.0.0.0) to the ethernet0/0 interface.
If you have a static public IP address from the ISP then you can replace the ethernet0/0 with the IP address given by the ISP.
That concludes the tutorial series for connecting your router to the internet cable, thank you for following the series, and please give me feedback about my posts.
Please read also:
Configure Cisco Router to Work With Cable Internet - Part 1
Configure Cisco Router to Work With Cable Internet - Part 2
Configure Cisco Router to Work With Cable Internet - Part 3


