27 September 2008

Configure PRTG for Network Monitoring


You can find a lot of network monitoring software from the internet, and lots of them are free to use.

And of course you'd hear a lot that the best and reliable network monitoring softwares are running on the Linux/UNIX platform.

Luckily nowadays, many network monitoring softwares can run on Windows platform, I have nothing against Linux/UNIX system, but for newbies, learning about networking is hard enough, not to mention having to learn Linux/UNIX system.
But for a network engineer, knowledge about operating systems available in the market is a must.

For now, if you used to Windows platform, then it's easier to use network monitoring software such as PRTG.
It's very easy to install, in fact anyone whose ever installed softwares before can surely install PRTG.

So skip on how to install PRTG and start on configuring PRTG to monitor your network.

After installation, you can access PRTG from your system tray, by the way PRTG monitors your network all the time and informs you for anomalies in your networks.
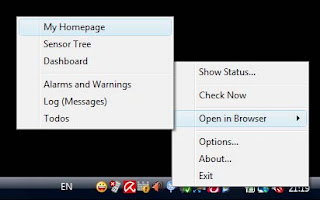

Provide the correct username and password, you would then be taken to the PRTG main interface in your default internet browser:
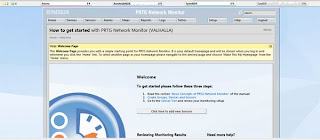

Notice at the top of the view, you can see the Global Status Bar, it shows the summary status of the sensors that you applied for network monitoring.

The interface is very easy to use, click on the desired feature you want to set and you'd be provided with information on that feature. You can even right click and do some contextual features from that right click menu.

For now, I want to set PRTG to monitor my Access Point. I have a Cisco Aironet 1240AG in my network and I want to monitor the traffic going in and out of the interfaces/ports.

First go to the "Devices" menu and click the "Add new device"
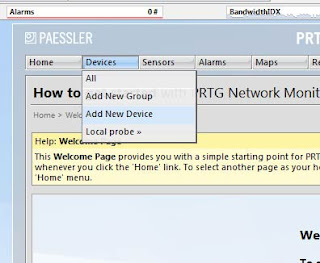

It will take you to the next screen, you can create a new group for your network devices here or add the network device to the existing group, click on continue.
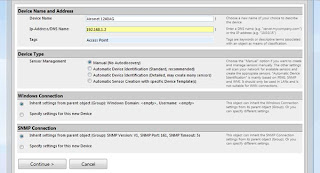

Fill in the information about the new device here, the device name, ip address of the device, tag to identify the device.
Next I just leave the Device Type option to default (Manual), and go straight to the Windows Connection menu.

Set up the username and password to access my Access Point, then at the lower menu, I set the SNMP Community String of the Access Point.
I already set the SNMP Community String to be publicSNMP.
SNMP or Simple Network Management Protocol is basically a protocol used to monitor status of network devices. SNMP will send out information about the status of the device in a set of time interval.
And the SNMP Community String is kinda like username and password so not everybody can see what information sent out.
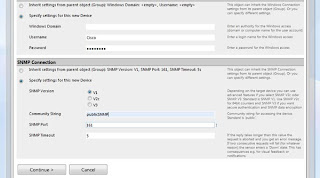

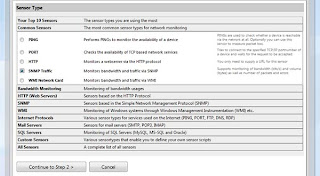
Click again the continue button and you will be given a bunch of sensors that you can apply on the network device.
As I said, I want to monitor the traffic going in and out of the Access Point, so I click on the SNMP Traffic option.

Next screen is where you choose and apply the configuration of the sensor. Cisco Aironet 1240AG has Dot11Radio0 (802.11B/G), Dot11Radio1 (802.11A), FastEthernet, and the BVI interfaces.

I don't use the 802.11A so I'll choose the 802.11B/G and FastEthernet interfaces only.
BVI is a Bridge Virtual Interface, it summarizes all the interfaces of the network device so you don't need to remember different ip addresses applied to the interfaces, you only need to remember the BVI ip address and use it to access your network device.

At last you can see the status of the interfaces that PRTG monitors, it has text and visual view. I don't have many things going on in my network so you won't see many traffic here.
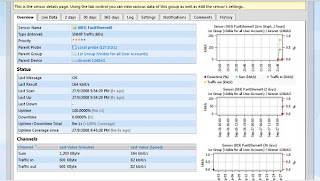

Easy to use isn't it, so happy

Read more!

26 September 2008

PRTG - Network Monitoring Software for Your LAN


PRTG from Paessler is an easy to use network monitoring software for your LAN. In fact, it can be used for any network - LAN, WAN, WLAN, and even VPN.

Wow, talking about a great network management software, this one is definitely worth to try.

PRTG network monitoring software available in three different versions, the freeware version (yaayyy celebrate), trial version and the commercial version.
They all different in term of features supported. For me, the freeware version is good enough to monitor my small LAN.

It doesn't need high hardware requirements to run and the great thing about this software is that it provides an easy to use installer.
Just grab the PRTG from www.paessler.com/prtg/download and run the installer.


Fill in and choose some options for the basic configuration and you're ready to monitor your network.

Using the PRTG, you'd hear a lot about Probes, Probe is one or more computers that actually do the network monitoring.
The reason you can have more than one Probe is that if one Probe fail, the other will take over monitoring your network.

PRTG also monitors the Probes' system health in your network, below is the graphical view of the Probe system health:


Next important thing in PRTG are sensors. PRTG freeware edition allows you to have 10 sensors in your network. One sensor monitors one single aspect of a network device. Some exampes (also mentioned in the PRTG manual) including:
  • One network service such as SMTP, FTP, HTTP, etc.
  • Traffic of one port in a network switch
  • CPU or memory load
  • One NIC traffic load
  • One NetFlow Device (NetFlow is network protocol from Cisco used for collecting traffic information)
  • etc.
Probes, sensors, and other objects in PRTG such as Groups, Devices, and Channels are shown in hierarchical view like this:


Network monitoring software such as PRTG is essential in networks, there are many reasons to use these kind of softwares.
You can monitor your network loads, analyze the traffic, and you get an instant notification if one of your network devices fail.

Read more!

25 September 2008

Using Putty for Connecting to Cisco Devices [VIDEO POST]


This should be my first time posting a video post, as much as I'm so nervous when recording it, I also enjoying it actually.

I decided to make video posts since you can learn how to configure networking devices much easier with videos.

Sure, connecting to Cisco devices using Putty is easy, anyone can do that, I know, but since this is my first time recording myself, it's still rough so you have to excuse me okay sengihnampakgigi
Also pardon for the bad English since it's not my mother tongue.

This post also related to my previous post about Serial to USB cable converter, be sure you check that post also.


All comments about this post are very much appreciated, I'd do better next time, thank you for watching.
Read more!

23 September 2008

But, My Laptop Has No Serial Port???


I reviewed about using console cable for connecting to your Cisco devices at my previous post, we know if we want to configure our Cisco devices for the first time we're going to need console cables.

Console cables have RJ45 connector at one end and Serial connector at the other end, the problem with this is that most of the newer laptops produced nowadays don't have any serial port.

Sure the laptops got smaller and lighter, but no serial port? This can be a slight problem for us, network engineers.

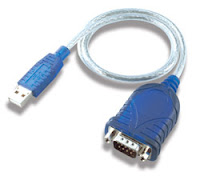
There's a way to get around this, we can use Serial to USB Converter cable. What this cable does is it converts your console cable serial connector so you can plug it to your USB port.

You can see at the image on the left is an example of Serial to USB converter cable, you can find many vendors produce this kind of cable.

To use it for your laptop is an easy work, all you have to do is install the driver, some cables can just work when plugged in, and sometimes you have to find the driver update first so it can work with your OS.

This happened to me once, I got my converter ready, did the correct parameters for connection but I can't connect to the router.
I search every possible cause for hours only to find that my converter driver need to be updated. So words of note, don't forget to download your driver update.sengihnampakgigi

When you done with the driver installation, the installation window will tell you where is the converter located COM1, COM2, or other.
If not, you can look at your Windows Device Manager and point to the Ports (COM & LPT), there you can find the location of your converter.


I'm not sure if this is true, but whenever you move your usb converter to other usb port, it will change the COM port number.
Just to be safe, remember where you plugged the converter for the first time and always plug there.

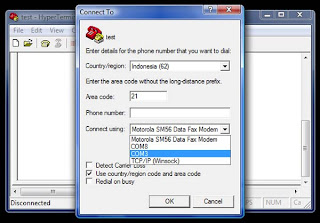
Next, you can use the converter to connect to the routers/switches. I used HyperTerminal Private Edition for this example:


Give a name for the connection then choose the COM port of your converter from the Connect using drop down menu.
Make sure you have the following parameters set:

  • Bits per second : 9600
  • Data bits : 8
  • Parity : None
  • Stop bits : 1
  • Flow control : None


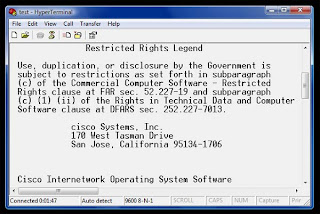
Click OK and you're ready to go.


Read more!

22 September 2008

Console Cable for Connecting to Cisco Devices


When you first received your Cisco devices out of the box, you're going to need console cable to start configuring your devices for the first time.

Console cable is a cable which has an RJ45 connector at one end (to connect to your Cisco devices) and serial connector at the other end (to connect to your PC).

Console cable made with the rollover cable wiring scheme, you can see at the image above how you can make your own rollover cable.
It's really simple actually, you just swap the first cable at one end to the last cable at the other end, second cable to the seventh cable, and so on.

As I said, one end should have RJ45 cable that you should plug at your Cisco Device console port and the other end has serial connector that you connect to your PC's serial port.

The images on the left side are the images of the console cable and serial connectors (DB25 on the left and DB9 on the right) provided by Cisco.

Below is the image of console port that you can find at Cisco devices:


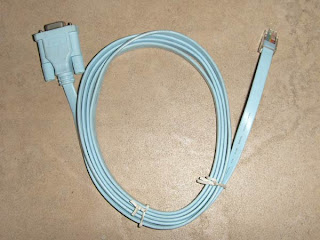
Cisco also has a console cable that already has an RJ45 connector at one end and pre-installed Serial Connector at the other end like this:


There's a reason why you should use console cable to configure your Cisco devices for the first time.

The devices come with a minimum configuration from the factory, they don't have any IP addresses so you can't telnet or SSH to them - telnet or SSH are the most common ways to configure your devices.
The best option is to use serial connection to directly configure the devices, this gives you a freedom to config them as you wish.

Read more!

9 Freewares for Your Cisco CCNA Home Lab


If you decided to build your own Cisco home lab, then I know you're going to need the following freewares for your LAN sooner or later.

These freewares I picked not because I think they're the best based on the functions but they are the ones I use in my home lab and what I think most handy for me.

By the way, I used the image above I found on the internet, if you click that image it leads you to a site where they held a freeware logo contest there, pretty cool.

Back again, I'll start with freewares that you can use to connect your PC to your Cisco Devices:

1. HyperTerminal Private Edition

Since Microsoft decided not to include hyperterminal in Windows Vista, you surely need this private edition version of HyperTerminal if you like the look of it.
You can use HT to connect to your Cisco Devices through serial connection or TCP/IP winsock.

2. Putty

Now Putty offers almost everything that you need for data communication, Telnet, SSH, RLogin, Serial Connection, proxy, anything, you name it.
One thing that I very much like from Putty is that I can change the font, color, the appearance of the Putty window.
I like to change it to be the matrix-like console, so I can get a "hacker" feel from it sengihnampakgigi

3. TeraTerm

Now sometimes when given too much offers like in Putty, newbies can get confused. TeraTerm offers the solution between the HyperTerminal and Putty.
It has simpler design than Putty but flexibility to change user interface.

4. Solarwinds TFTP Server

If you're working with Cisco Devices, sooner or later you're going to need TFTP server. TFTP server is used to upload and download file to or from network devices.
You can use TFTP server to save your configuration files, backup your IOS, upgrade the IOS, store DHCP bindings if you're using your router as DHCP server, etc.

5. Kiwi Syslog Daemon

Syslog is used to receive messages from your network devices, and then display them in real time.
If you're using syslog in your LAN, you can find out immediately if your ports or devices are failing, and know exactly the errors are happening.
You can also use this Kiwi Syslog Daemon as an alert system, sending you email when one of the devices in your LAN is failing.

6. Cisco TACACS Server for Windows

This is not a software released by Cisco but more like a custom software based on Cisco source code.
If you don't know what TACACS server is, it is a server that stores your users' credentials such as user names and passwords.

If a user want to access something in your LAN, the TACACS server will check the credentials first before allowing the user to do something further.

The CCNA exam won't test you in configuring TACACS server, but it's fun to configure so try it out.

7. Wireshark

Now this baby is dangerous, you surely know Wireshark (previously named ethereal). It's a protocol analyzer, it can sniff, grab everything that running around in your network and view it.

No, I'm not telling you to sniff on your users data but Wireshark can be a very valuable learning tool for your exam.

You can use it to view what's going on behind the scene when you set up routing protocol or anything else in your LAN, see what things are transferred, see how they interact, etc.

8. PRTG Network Monitor

PRTG Network Monitor from Passler is a powerful network monitoring solution you can used to monitor your network devices, not just Cisco devices, it gathers all your devices' status and display them in graphical report.


There are other tools you can use to monitor your LAN, you can see a list from Cisco, what they recommend for monitoring Cisco devices here:
http://www.cisco.com/warp/public/732/Tech/nmp/netflow/partners/freeware/index.shtml

9. Tenable Nessus

If you want to scan your network for vulnerabilities, you can use Tenable Nessus. It's not exactly necessary for Cisco Devices since you're in control of what ports you're using for your network devices, but you can use Nessus for scanning your users' machines.

More on this you can find at my previous post.

Well, that's it the freewares that you can use in your home lab, there are vendors that produce an all in one solutions for your network such as Solarwinds and Kiwi, of course you have to pay for the advanced version.

This is fun, I found other tools when researching for this post, think I'll use it in my network and share it with you next time.

Read more!

16 September 2008

Don't Use Braindump Software for Preparing Exam!?!


I got the inspiration for writing this post from my last post "8 Things To Help You Pass CCNA Exam".

I posted about the things I consider necessary to boost your chance in passing the CCNA exam, and without knowing the legal aspect I foolishly added about Questions Bank and Exam Simulators (braindumps) in my points.

Luckily one of the readers - Robert Williams - from certguard told me that using those two points are illegal and can get you loose your certifications.

What??? hah I didn't know about that. Luckily I do now, and hopefully I can share something about this to you.

After receiving Robert's comment, I took a research about braindump, so what exactly is braindump?

According to wikipedia brain dump is

the transfer of a large quantity of information from one person to another or to a piece of paper can be referred to as a 'brain dump'.


In a certification world apparently the braindump software is like questions bank or exam simulators made by people took certain exam and share the questions to other people in reward of money.

Why is it illegal to use braindump software? I quoted the following from certguard:

Back when a braindump was a 'Brain Dump', they weren't as harmful. Were they illegal? Maybe they were, maybe they weren't. By today's standards, YES they were illegal, but many Certification Vendors hadn't put those standards into place until AFTER the number of thefts was truly visible, hence the reason for the Non-Disclosure Agreements that we are all forced to read today.

Then, in 1995, a company came along that screwed up our entire Certification world. They took braindumping to a new level by mass producing thousands upon thousands of certification questions from multiple certification vendors and selling them to unsuspecting candidates at an unbelievably LOW price.

Braindump users have compromised the IT Industry by reducing the value of certifications. Exam takers without solid IT experience are artificially passing exams to better their chances of employment in the industry. Unfortunately, as they become employed they do not provide companies with competant skill sets. This in turn makes them less valuable and reduces the salary IT workers are paid. Ultimately this makes the hard won certificatons by legitimate test takers with solid skills and experience suffer.

Sadly, many IT jobs have been outsourced to substandard workers at lower wages. To get their foot in the door they use braindumps to achieve certifications. No one wins in this situation. The company suffers and when the company suffers so do the outsourced workers.

Braindumps hurt everyone.


I honestly don't know how they find out whether you're using braindump softwares or not, but it's more like a self conscious part of you.
Do you want to pass the exam badly, or you want to pass it in dignity?

I also don't know which software is illegal, to find out, certguard provides this link to check the legality of the software.

I personally agree with certguard people, let me know what you think about this by commenting this post, thanks.


Read more!

15 September 2008

8 Things To Help You Pass CCNA Exam


Many CCNA candidates don't have any clue how to prepare on the CCNA exam, and many have failed because they didn't prepare enough.
Nervous when the exam date come and failed miserably due to minor mistakes.

This is my way to prepare for the exam, in my point of view, candidates may or may not agree to me, but I passed the exam in one shot and had pretty good score (i forgot the score), I only got one false answer I think.

I don't mean to show off, but my point is anyone can get this score if you prepare properly, so here is my 6 things to help me pass CCNA exam:

It is natural to get as many resource about the exam, but too many information can seriously damage your brain. The key is to get the right resource to learn from.

1. BOOKS

Personally I like the work of Todd Lammle, he explains the topics in CCNA exam with easy ways for newbies to understand.
The problem with books is that your eyes can get tired reading them all day long, so I figure I need some other resources.

2. VIDEO TUTORIALS

My recommendation for video tutorial is from CBT Nuggets, especially the author Jeremy Ciaora, great video series.
Sure the video is quite expensive US$ 399.00 for the CCNA Certification Package, but I'm telling you its worth the money.
In the video you can watch configuration of true Cisco devices along with the explanation, for me Jeremy Ciaora did a great job in explaining the topics.
The video is great but sometimes it doesn't cover everything about the exam, that's why you also need the books.

3. BLOGS/SITES

Browse the net, find free exam questions that you can try answering, find out how everyone did the exam, how they succeed, how they failed, this can be a very valuable lessons for you.
Visit my blog often kenyit.

4. CISCO SIMULATORS

You can get many free or paid Cisco Network Simulator from the internet:

Dynamips - free router simulator using command line interface (no GUI)
GNS3 - GUI version of Dynamips
Boson NetSim - paid simulator complete with labs samples
Cisco Packet - free simulator from Cisco

It is very important to get your hands on one of these simulators, you need to get yourself a hands on experience with cisco devices.
If you have more budget, build your own Cisco home lab.

UPDATE START - 16 SEPTEMBER 2008

As one of the readers commented on this post (thank you Robert Williams), I realized that using braindump softwares are illegal, I decided to empty the following two points:

5. QUESTIONS BANK

6. EXAM SIMULATOR


UPDATE END


7. TIME

I can't stress you enough about this, but you have to invest your time seriously to take the exam. The CCNA exam is not the kind of exam where you can cram yourself to study in the weekend and hope to pass in the following Monday.

When I talk about time, it also means that you have to practice yourself in answering questions as quick as possible, remember you have a very limited time and you can't go back to previous questions you've answered.

8. D-DAY PREPARATIONS

The d-day has come, you're nervous as hell, you can't bring anything to the exam class except for pens or pencils.
You'd be given a scrap of paper to calculate subnets or something else.

This is a good news, you do allowed to take notes on the paper when taking the exam. Before you get even more nervous, you can write down the keypoints in calculating subnets, for example 8th bit = 128, 7th bit = 64, 5th bit = 32, and so on.

This will speed your time in calculating subnets.
But remember don't write down any configuration commands because they might think you're cheating.

Why only subnets? I have to remind you that CCNA exam will test you heavily on subnetting, and in my opinion it will be the topic that is taking most of your time in the exam.

That's all I got to say right now I hope the above things can help you out. If you have any other suggestions, please kindly comment on this post.

Cheers.

Read more!

11 September 2008

Building Your Own Cisco CCNA Home Lab


You know that you can build your Cisco home lab using many simulators out there, but I must say, nothing beats the real Cisco devices.kenyit

Imagine having Cisco devices in your own local area network, awesome.
And also, having a real hand experience on these devices can surely boost your chance passing the CCNA exam.

If you have more budget in your hands, then go for it, buy used Cisco routers and switches. You can get them at relatively cheap price - compare to the real price, you're looking for an average price above US$ 1,000.

At the used Cisco sellers you can get discounts up to 90% or more. Even though they're used but Cisco devices are tough, yet you still have to be careful buying, check the sellers reputation first, and make sure you have warranty at minimum 6 months.

So, which devices should you buy, there are many Cisco series out there. If you need these devices on your LAN for the CCNA exam, the key is to know what topics are tested at the CCNA exam.

Lets see, you definitely need routers and switches, you're going to need at least 2 routers and 2 switches.

Routers

Having 2 routers allows you to practice on routing protocols, and 2 switches lets you practice on VLANs, VTP, etc.

The best routers for CCNA home lab I think are the 2611 series routers, they have slots that allow you to add modules in case you need to upgrade your routers to enable VOIP, WAN, etc.

The 2611 can cost you from less than US$100 - 200 depends where you buy them.

If you have more budget, buy the WIC-1T (US$ 30 - 50) to simulate WAN in your network.
The CCNA exam will test you on WAN protocols, in my opinion, having the WICs are not too urgent, but if feel like it, then go for it.sengihnampakgigi

To make things complete for your WAN environment, you can buy additional 2523 router at less than US$ 100. What this router can do is to act as Frame Relay Switch. So you can pretend to be an ISP in your LAN that connects two different networks located half way around the world, cool.

Switches

Next is the switch, you don't need a great Layer 3 switches for the CCNA exam, plus it costs more than US$ 500 each.

You can buy something like Catalyst Switch 2924 or 2950, they should be enough for the exam.
12, 24, or 48 ports? it's all up to you.

What you need to concern when buying the switch is that you have to check all the ports in that switch, sometimes few of the ports got damaged.

Cables

The most important things, but often forgotten by newbies are the cables. Make sure the seller provide you with the power cable and console cable for configuring the Cisco devices.

One end of this console cable is RJ45 that you plug into the Cisco devices and the other end is for connecting to your PC's serial port.

You can actually make your own console cable, but it is much more convenient to get it from Cisco.


If you are going to use the WIC, then you'd need the following DB-60 crossover cables, you plug in this cable at the WIC card back-to-back to another router.


Access Server / Routers

Now you don't actually need access server in you LAN, but it is so convenient that one day you'd need them anyway.

Access servers allow you centralize your configuration without having to plug and unplug the console cable between routers and switches.
You can buy the 2500 series routers (2509, 2510, 2511, or 2512) for access servers, you need to buy also the octal cable.

Octal cable is a cable with one end plug to the asynchronous serial port of the 2500 series router and the other end(s) have 8 RJ45 console cable hah.

Wow, can you imagine that, that's genius, with one octal cable you can control up to 8 Cisco devices. Here's how the cable looks like:


There you have it, many people will suggest different devices in your home lab, it's really up to you and your budget.
When you're lucky enough you can have a pretty complete Cisco home lab for under US$ 1,000 and I need to tell you that many people out there selling what is called Cisco lab kit.
Cisco lab kits are sets of Cisco devices usually for certification purpose, they have from lab kits for CCNA until CCIE, and the important thing is that they sell them with pretty good price.

Happy hunting.
celebrate

Read more!

10 September 2008

Alternate Firmware for Your Routers


Have you ever got the feeling that your routers don't give you enough power to give you all the goodies that a network can offer though you've spent a quite good amount of money on them?

Or maybe you just want to do something else interesting with your routers, not just leave them there doing all the routing for you.

Well, routers, typically with the linux based OS can be upgraded using a third party or alternate firmware.
Those routers including the picture I show you, the WRT54G series that are often used for home local area network.

Of course you only want to replace the firmware of your home routers, not your Cisco routers sengihnampakgigi.

With alternate firmware you can do some cool stuff, such as
  • Firewall feature
  • IPv6 feature
  • Site survey using your router
  • Syslog support
  • QoS (Quality of Service)
  • some even support VLAN
  • and many other good stuff
There are many alternate firmware available in the internet, the paid and free ones, some of the good ones:
OpenWRT
DDWRT
Tomato Firmware
Sveasoft

Each of the firmware is unique, they have different features and support many different routers like linksys, buffalo, belkin, corega, asus, and pretty much all home usage routers in the market.

Just make sure your router is listed in the supported hardware of the alternate firmware, and it has the specifications required to run the firmware, such as the flash memory, ram, etc.

Some firmwares offer graphical interface for the configuration and some others provide only the command line style configuration.

So if you need more features on your routers and geek enough to do it, upgrading the firmware to alternate firmware is awesome.
Is it safe to do this, I would not say it is, but firmware like this is supported by many developers and used by many people, try research first before deciding to upgrade.

Cheers
celebrate

Read more!

09 September 2008

Subnet Calculator


One of the biggest challenges to design your local area network and for taking the CCNA exam is calculating subnets.
Actually to calculate subnets is quite easy but it can be confusing for networking newbies. And luckily there are many tools out there that can help us in this problem.

One of the tools is Boson Subnet Calculator, you can download this tool for free from Boson. This thing is very handy, it can calculate subnets, find out which subnet an address belongs to, do a wildcard checking, and have a Decimal IP Calculator.

 
 The only thing you need to do to find what addresses belong to a subnet is just insert the IP address of a computer to the Host IP and slide the Mask bit to match your subnet mask.
As the above picture, I typed in 172.16.10.5 and subnet mask of 255.255.248.0. Immediately I know what addresses for that subnet, you can see them at the Current Host Range.
This tool also valuable to learn subnetting since it shows how it calculates the subnet, recommended for companion to pass CCNA exam.
Too bad you can't use this at the CCNA exam.

Read more!

07 September 2008

GNS3: Simulator for Your CCNA Exam


When pursuing for the CCNA title, you need to get yourself familiar with the Cisco devices, at least you have tried typing in some commands to configure the Cisco devices.
With a very limited budget, I'm sure it'll be very hard to buy your own Cisco routers and switches, although the prices are quite cheap these days on ebay.

To get around this problem you can use many Cisco simulators that are available out there, one of my favorite is the GNS3.
One problem I found with other simulators is that they don't support all of the commands in the Cisco devices, the GNS3 provides all of them since it is using a real Cisco IOS - the operating system of Cisco devices.
The only drawbacks using GNS3 are:
  1. You have to have your own IOS, it's not provided for free from Cisco.
  2. It can't simulate switch due to the ASIC hardware used by Cisco switches, but you can use router modules provided by the GNS3 to simulate switches using routers.
  3. You have to tweak the simulator since it is simulating Cisco devices real time in your PC, it can eat up quite a lot of the PC processor and memory. No worry, you can find how to tweak the simulator in the provided manual from GNS3.
Other than the drawbacks, this simulator is awesome, it's like having your own Cisco devices to play with. Here is the sample of GNS3 interface:


There you can see you can add as many devices as your PC hardware allows, and you can access them through your command prompt telnet function to do the configuration.


Words of note, you can use command prompt telnet function if you use windows XP but in Vista you can't. The reason is Vista doesn't provide telnet function anymore so you have to download third party software for this, many are free by the way.
The coolest function of GNS3 is that if you're connected to the internet, you can simulate your NIC to provide internet connection to GNS3.
You can try configuring internet connection to the routers and test by pinging real live public internet addresses to see if you configure the connection correctly.
You can also install the GNS3 on several PCs and let the simulated routers communicate between the PCs, you can ping between the routers on different GNS3 simulators, and other function too, to keep the processing and memory requirements low, cool.

Read more!

06 September 2008

TCP and UDP


If you're aiming for the CCNA exam, you definitely have to know about the TCP and UDP protocols. TCP and UDP are protocols that are running on the layer 4 / Host to Host layer / Transport Layer of the OSI Layer.

TCP (Transmission Control Protocol) is what you can say reliable protocol, it numbers each segments that are sent and wait for acknowledgment from the receiving side, when received at the end, the transport layer at that end will assemble the segments and deliver them to the upper layers.

This protocol is said to be connection oriented, it creates a virtual circuit which is a path between the source and destination.
Think of it like making a call, first you pick up the handset and dial a number, this will establish a path and maintain that path until you hung up the phone, same cronology happens at the network world.

Here is what TCP segment format looks like:


In typical CCNA exam question, you'd be asked to differentiate between TCP and UDP segment format, you don't need to remember all the fields up there, after seeing the UDP segment format you'll easily differentiate between TCP and UDP segment format.

UDP (User Datagram Protocol) is a connectionless protocol, it sends all segments to the network without have to wait acknowledgment from the destination host.
There are many reasons to use the UDP, for example in the SNMP used to monitor the network. The SNMP would constantly send messages to update the current status of network devices, using UDP would conserve your bandwidth because the format of the UDP, not to mention if you have to wait acknowledgment for every message you send.

Here is the UDP segment format:

 
Now you know how you can easily differentiate between the TCP and UDP segment format, the UDP has less fields. You can also understand why UDP can conserve the bandwidth in your network.
In my opinion, CCNA exam is a very fair exam, they won't try to trick you by adding false fields in the format, you just need to remember that the UDP segment format has lesser fields than the TCP format.
Related to the CCNA exam also, you need to know which application ports belong to the TCP and which are the UDP's. In some cases, an application would use both protocols such as DHCP.

Read more!

03 September 2008

How Network Devices Communicate


Getting to know a little deep about how the network devices communicate in your LAN can be quite handy, especially if you're going to take the CCNA exam.

You can find many questions related to the how network devices communicate, what data unit they're using. You have to remember the data unit related to each layer in the OSI Layers.

From the upper layer generate the data, the transport layer turn this data into segments, the network layer divide them into packets, data link layer then divide again into frames, and lastly the physical layer will handle the bits.
You need to be familiar how each device treats the data unit.

Here is the typical question you'd get in the CCNA exam, look at the below picture:


As a network admin you have the above network diagram, you have 2 networks, 192.168.1.0 and 192.168.2.0. Host A sends a request to see email from the Mail Server, what are the destination and source of MAC address and IP address received by the Mail Server?

Now when facing this question we first need to know what will the Host A send to reach the Mail Server.
A Host in a network will only know about its own network, it doesn't know anything about the other network accept for the IP address. So Host A will send the following:

Source MAC : 00-14-BA-AA-AA-AA (the host MAC address)
Destination MAC : 00-14-BA-BB-BB-BB (the router's FA0/0 port MAC address)
Source IP : 192.168.1.2
Destination IP : 192.168.2.2

In term of MAC addresses, remember the host only knows the MAC address of its default gateway (router).
The host will send it to the switch, switch will examine the frame and send it to the port which the router attach to.
Switches always remember the MAC addresses attach to their ports, switches keep this information in its database.

The switch then send it to the router. Router receiving this packet will then examin the packet further. It will check the packet for corruption then strip off the MAC address.
Router will determine where it should forward the packet to, it will first add its own MAC address as the source address and the next hop (router or PC) MAC address as the destination address.
The source and destination IP address will not be altered.

So at last the Mail Server will receive the following information:

Source MAC : 00-14-BA-CC-CC-CC(the router's FA0/1 port MAC address)
Destination MAC : 00-14-BA-DD-DD-DD(the Mail Server's MAC address)
Source IP : 192.168.1.2
Destination IP : 192.168.2.2

Read more!

01 September 2008

How To Terminate UTP Cable to Toolless Modular Jack


Last post I talked about how to terminate to Modular Jack, it was not hard at all right? There are also modular jacks type that are toolless.
The toolless jacks allow you to terminate UTP cable without the punch down impact tool, though you still have to use cable stripper and scissor, so they're not exactly toolless.

The one that I once tried using before was the one from AMP, lets see if they really cut down the time in terminating the cables.


The tools you need is exactly the same when terminating to regular jacks, but you can exclude the punch down impact tool and add a cutting tools like scissor or cutter.
Here are the steps:

Step One:

Still same with the regular jacks, strip the cable jacket and untwist the cables.

Step Two:

Insert the cables to the holes according to the color codes printed on the jack

 
Now this process takes a little bit more time if this is your first time terminating cables to toolless jacks.
Step Three:
Cut the excess cables using scissor or cutter, it would be easier to use technician scissor.

Make sure you cut them in even length.

Step Four:

Close the cover using your hand, this is quite hard, just close it until you're sure it's firmly closed, and attach the jack to the wall face plate.

 
There you have it, toolless modular jack termination.
In my opinion, I prefer to use the regular jack instead of the toolless ones, I'm more used to terminate to the regular ones and for me, it's harder to arrange the cables in the toolless jacks.
Then again it's up to you to choose, in term of price, the regular and the toolless jacks are not too much different, but the punch down impact tools do cost some good amount of money.

Read more!