Configuring VLANs
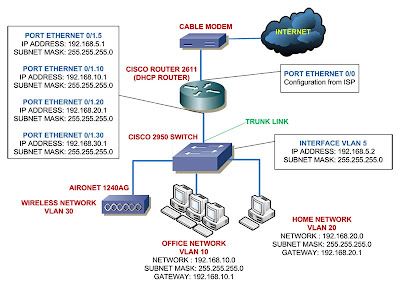
I'll start the configuration of adding switch to my Cisco home lab by configuring the switch first. At the previous tutorial series, I posted about how to connect Cisco router to cable internet, and now here's how the network will look like again when added a switch to it:
 The network will have 4 VLANs, with the VLAN 5 acting as the native VLAN.
By default, the native VLAN of Cisco switches is VLAN 1, you might want to change the native VLAN from VLAN 1 to other VLAN since there a security concern about this.
You can read a nice article about native VLAN security concern from cisco.
In 2950 switches, you have to type in these commands to create VLANs:
C2950> enable
C2950# configure terminal
C2950 (config)# vlan 5
C2950 (config-vlan)# name MANAGEMENT
C2950 (config-vlan)# vlan 10
C2950 (config-vlan)# name OFFICE
C2950 (config-vlan)# vlan 20
C2950 (config-vlan)# name HOME
C2950 (config-vlan)# vlan 30
C2950 (config-vlan)# name WIRELESS
You can verify that you successfully created the VLANs by issuing this command:
C2950# show vlan
Now to set the VLAN 5 as the native VLAN and assign it to be the native VLAN, we should do this:
C2950 (config)# interface VLAN 5
C2950 (config-if)# ip address 192.168.5.2 255.255.255.0
C2950 (config-if)# no shutdown
By issuing the no shutdown command, the VLAN 1 will be automatically shutdown and replaced by the VLAN 5.
Assigning an IP address to the VLAN other than VLAN 1 will make that VLAN as management VLAN so your switch can be accessible for configuration using telnet.
You can only alter the Native VLAN from VLAN 1 to other VLAN but you can't delete the VLAN 1.
Next thing you need to do is assigning those VLANs to the switch's ports.
I'll start the configuration of adding switch to my Cisco home lab by configuring the switch first. At the previous tutorial series, I posted about how to connect Cisco router to cable internet, and now here's how the network will look like again when added a switch to it:
 The network will have 4 VLANs, with the VLAN 5 acting as the native VLAN.
By default, the native VLAN of Cisco switches is VLAN 1, you might want to change the native VLAN from VLAN 1 to other VLAN since there a security concern about this.
You can read a nice article about native VLAN security concern from cisco.
In 2950 switches, you have to type in these commands to create VLANs:
C2950> enable
C2950# configure terminal
C2950 (config)# vlan 5
C2950 (config-vlan)# name MANAGEMENT
C2950 (config-vlan)# vlan 10
C2950 (config-vlan)# name OFFICE
C2950 (config-vlan)# vlan 20
C2950 (config-vlan)# name HOME
C2950 (config-vlan)# vlan 30
C2950 (config-vlan)# name WIRELESS
You can verify that you successfully created the VLANs by issuing this command:
C2950# show vlan
Now to set the VLAN 5 as the native VLAN and assign it to be the native VLAN, we should do this:
C2950 (config)# interface VLAN 5
C2950 (config-if)# ip address 192.168.5.2 255.255.255.0
C2950 (config-if)# no shutdown
By issuing the no shutdown command, the VLAN 1 will be automatically shutdown and replaced by the VLAN 5.
Assigning an IP address to the VLAN other than VLAN 1 will make that VLAN as management VLAN so your switch can be accessible for configuration using telnet.
You can only alter the Native VLAN from VLAN 1 to other VLAN but you can't delete the VLAN 1.
Next thing you need to do is assigning those VLANs to the switch's ports.


